How do you remove a flood light bulb?
How do you remove a flood light bulb?
Turn the floodlight bulb counterclockwise with your fingers until it completely unscrews from the light socket. Some floodlights use two pins instead of screwing into a socket. If the bulb stops once you turn it counterclockwise a quarter-turn, pull the bulb down slightly.
How do you change led flood light bulbs?
How to change LED flood light:
- STEP 1: Switch off the power to your LED floodlights.
- STEP 2: Loosen the screws with a screwdriver to open the front cover of your floodlight.
- STEP 3: Remove the bulb that needs replacement.
- STEP 4: Handle your replacement bulb with care.
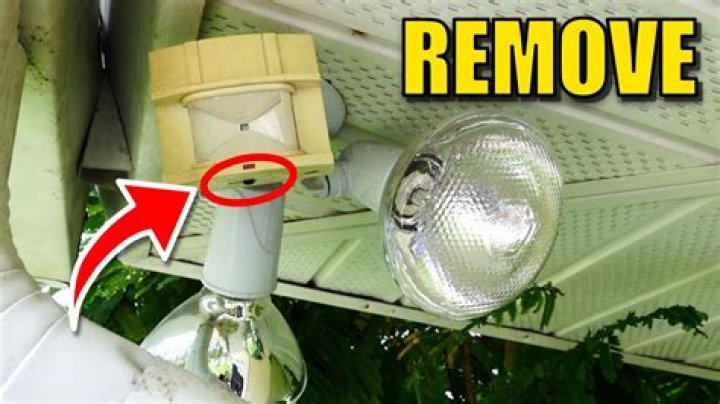
Why do LED flood lights fail?
One reason why an LED lamp might expire before it’s rated lifespan could have to do with the temperature of the environment it is in. If the temperature around it gets too hot and it does not have a proper heat sink, that can cause the LEDs in the lamp to overheat and then it will fail.
Why do LED flood lights dim?
LED bulbs can lose their brightness due to premature aging, bad internal components like a capacitor or LED arrays, or the common cause of loose wiring. Heavy load appliances on the circuit can also cause that LED lights are dim.
How do you replace an outside wall light?
- Step 1: Remove Existing Light. Before you begin any project dealing with electricity, you MUST disconnect the power at your main circuit breaker panel or fuse box.
- Step 2: Replace the Mounting Bracket. A new light fixture should come with mounting hardware.
- Step 3: Wire the Outdoor Light.
- Step 4: Install the New Fixture.
What’s the best way to remove a stuck flood light?
Do not pull downward when twisting this increases pressure on the threads and will make it harder to remove the bulb. Twist slowly to release the bulb. Just like with the duct tape handles this method more evenly distributes the force you’re applying to the bulb and should let you loosen it without breaking it.
How do you replace a floodlight bulb in a ceiling fixture?
Place a stepladder or a step stool under the ceiling fixture so you can reach the floodlight bulb comfortably without overstretching. Remove any trim from the fixture, if you are replacing a floodlight bulb in a recessed ceiling fixture.
What happens when you change a flood light bulb?
Sometimes, a floodlight bulb will simply screw out and you will only need to screw a new one in place. This is the best-case scenario, but it won’t always happen this way. Make sure the lights are off before you change a floodlight bulb and that the old bulb has time to cool so that you can handle it without burning your fingers.
What’s the best way to replace a light bulb?
If there’s any trim that keeps the bulb in place, unscrew it and keep the screws safe so you can replace them later. Take the correct screwdriver up the ladder with you to prevent having to make two trips up and down.
Do not pull downward when twisting this increases pressure on the threads and will make it harder to remove the bulb. Twist slowly to release the bulb. Just like with the duct tape handles this method more evenly distributes the force you’re applying to the bulb and should let you loosen it without breaking it.
What to use to remove a stuck light bulb?
Use duct tape and a coffee cup to remove a flood light that is stuck in a recessed lighting fixture.
How do you replace a fluorescent light cover?
Once you install a wraparound cover replacement or have finished replacing fluorescent light bulbs, secure one long side of the light cover over the lip, then repeat on the other side. The other two types of fluorescent light covers discussed so far are relatively inflexible but still lightweight.
Sometimes, a floodlight bulb will simply screw out and you will only need to screw a new one in place. This is the best-case scenario, but it won’t always happen this way. Make sure the lights are off before you change a floodlight bulb and that the old bulb has time to cool so that you can handle it without burning your fingers.
